Today you don’t need to create your own customer support system, instead, you can use specialized services. Zendesk is one of them, it has a help center, support system and many other features. It also allows enabling SSO(single sign-on), so end-users can be seamlessly authenticated from other systems. In this article we are describing how to integrate existing authorization procedure with Zendesk using JWT(JSON Web Tokens).
How it works
Zendesk JWT Single Sign-On works as follows:

- When a user tries to get access to Zendesk’s resources which need authorization, it redirects them to the authorization page specified by an administrator.
- Then if the user is authorized, an authorization server should return JWT for Zendesk service
- Zendesk’s JWT should be placed in payload when redirecting back to Zendesk.
That’s it after that user will have access to private content. Now let’s look at this more detail, step by step.
Zendesk settings
First of all, we should log in to Zendesk as an administrator and enable SSO (Admin -> Center -> Security -> Single sign-on or by URL mycompany.zendesk.com/admin/security/sso).
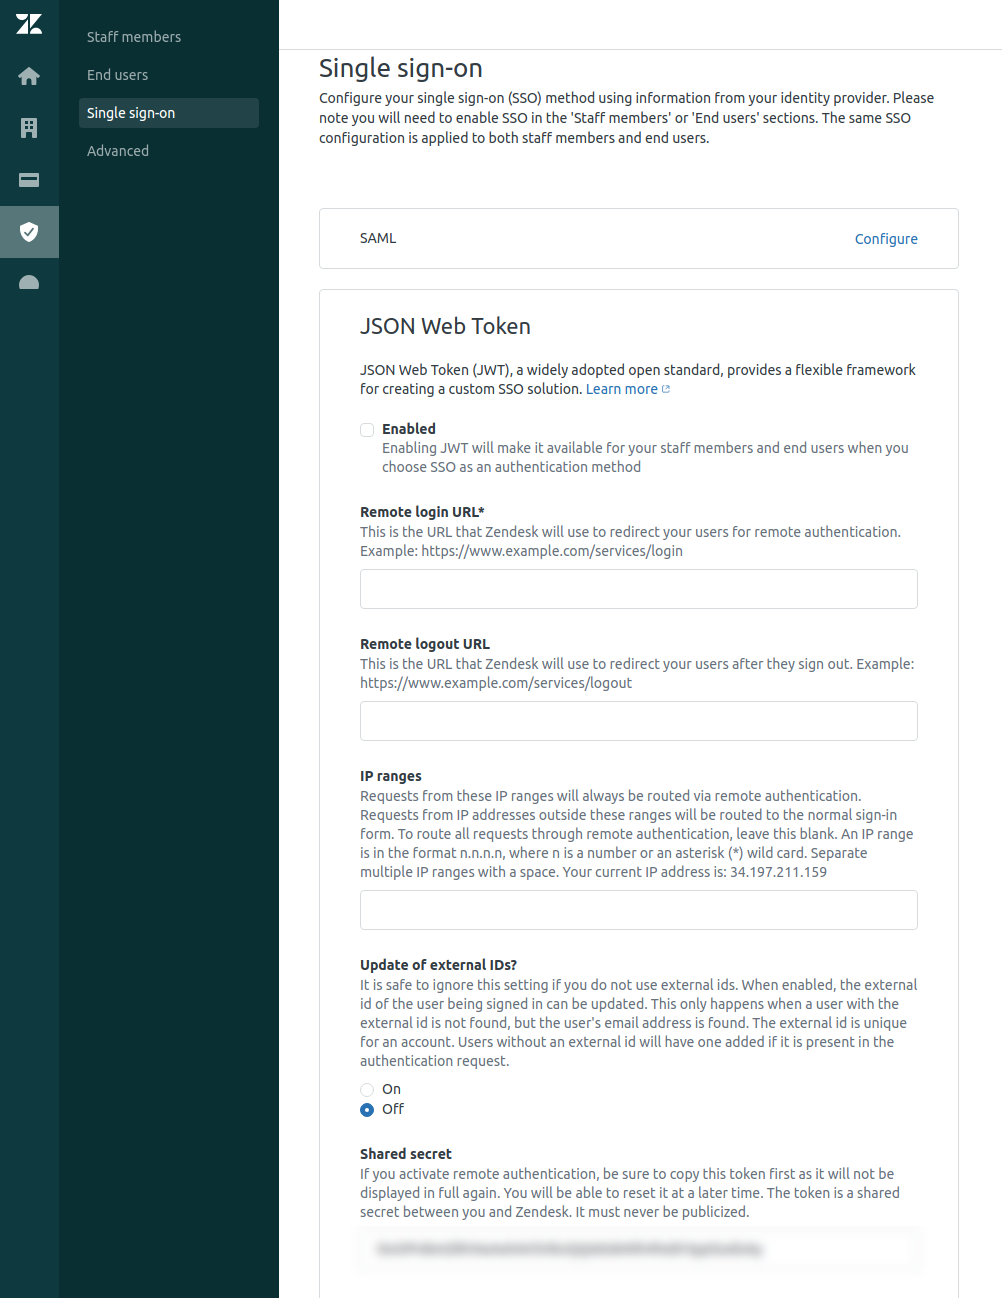 Then you should configure JWT SSO:
- Remote Login URL – URL where Zendesk will redirect your users (Authorization page)
- Remote Logout URL – URL where your users will be redirected after sign-out from Zendesk
- Shared Secret – a random string generated by Zendesk that uses when a new JWT is signed
JWT generator
The Second step is about JWT. After successful sign-on, you should generate new Zendesk JWT. It doesn’t matter what language you choose, but it’s important that JWT algorithm must be HS256 and it’s required to add follow attributes to payload:
- iat – issued at, number of seconds since UNIX epoch
- jti – unique token id, please keep it unique if you want to prevent security vulnerabilities
- email – must be unique for each user because it uses to identify a user
- name – username in Zendesk
There are also some optional attributes, you can find their descriptions in the official documentation. Additionally, we must use Shared Secret as a salt for the JWT algorithm. We’ve written the simple function using Java and Auth0 JWT library which returns JWT with required payload, please look at the code below:
final String zenDeskSharedSecret = “stared-secret-example” final List
tags = new LinkedList<>(); tags.add(“FIRST_PRIORITY”); final String jwtId = “zendesk-example-id-”.concat(String.valueOf(new Date().getTime())); final Map<String, Object> header = new HashMap<>(); try { return JWT.create() .withHeader(header) .withIssuedAt(new Date()) .withJWTId(jwtId) .withClaim(“email”, “example@example.com”) .withClaim(“name”, “example”) .withClaim(“tags”, JSONArray.toJSONString(tags)) .sign(Algorithm.HMAC256(zenDeskSharedSecret)); } catch (UnsupportedEncodingException e) { throw new ZendeskException(“Error when generating a new Zendesk token”, e); }
Back to Zendesk
The last step is the redirect a user back to Zendesk with created JWT as payload. Here is the example of the redirect URL:
There are you can see two query params:
- jwt – JWT which was created earlier on a back-end
- return_to – URL where a user will be redirected to
IMPORTANT NOTE: As return_to you can use received earlier value, Zendesk should pass it as an eponymous query param when redirect to your authorization page.
Done, after that user must be able to see everything that he is allowed to see.
Final Thoughts
Zendesk is a good choice if you are looking for customers support platform, especially if you would like to integrate it with your existing authorization provider. You just need to make your hands a little bit dirty to establish JSON or SAML single sign-on. Additionally, you can use other awesome features of Zendesk to provide the best user experience.
Useful Links
Need help with your cloud architecture?
Schedule a Free Consultation

