There is nothing more frustrating than having to deal with preparation work instead of focusing on the problem. The anticipation of going through dozens of infrastructure provisioning steps can kill those powerful yet fragile urges to create something new right here, right now.
In this blog post, I’d like to go through possible ways of implementing secure and flexible, yet simple to provision infrastructure patterns on Amazon Web Services.
Prerequisites
My ideal PoC environment must satisfy requirements in order for me to efficiently use it. Here are those I find the most important:
- Infrastructure as a Code. I don’t want to click things and having to remember what things I’ve clicked.
- Single-command infrastructure provisioning and teardown.
- CI/CD. Under any circumstances I want to manually deploy something. This is too time-consuming and cumbersome.
- Application packaging as an OCI image. For me, it’s important to know the same build can be deployed to different environments.
- Push-to-deploy. I want to be able to push changes to the environment once the code reaches corresponding branch.
- Statically-generated frontend delivered via CDN.
Application structure
I’m going to use a data integration project as an example. PostgreSQL is used as a database, Redis streams are used for records streaming. The backend is implemented in Java and the Spring Boot framework is utilized.
Frontend is implemented as a React.js application in combination with Zustand and react-hooks.
Infrastructure design
Let’s start with the application infrastructure design. The foundation is the network. Since we are using Amazon Web Services, we’ll be creating a VPC for the project along with subnets. For Infrastructure as a Code, we are using * Amazon CDK* for Java.
final Vpc vpc = new Vpc(this, "SMO-VPC-DEV", VpcProps.builder() .natGateways(0) .maxAzs(3) .subnetConfiguration(Arrays.asList( SubnetConfiguration.builder() .subnetType(SubnetType.PUBLIC) .name("smoPublicSubnet") .cidrMask(24) .build(), SubnetConfiguration.builder() .subnetType(SubnetType.PRIVATE_WITH_EGRESS) .name("smoServices") .cidrMask(24) .build() ) ) .vpcName("smo-vpc-dev") .ipAddresses(IpAddresses.cidr("10.0.0.0/16")) .build());Note we are not creating any NAT gateways for the sake of simplicity and to be cost-efficient. The resulting network structure is as follows:
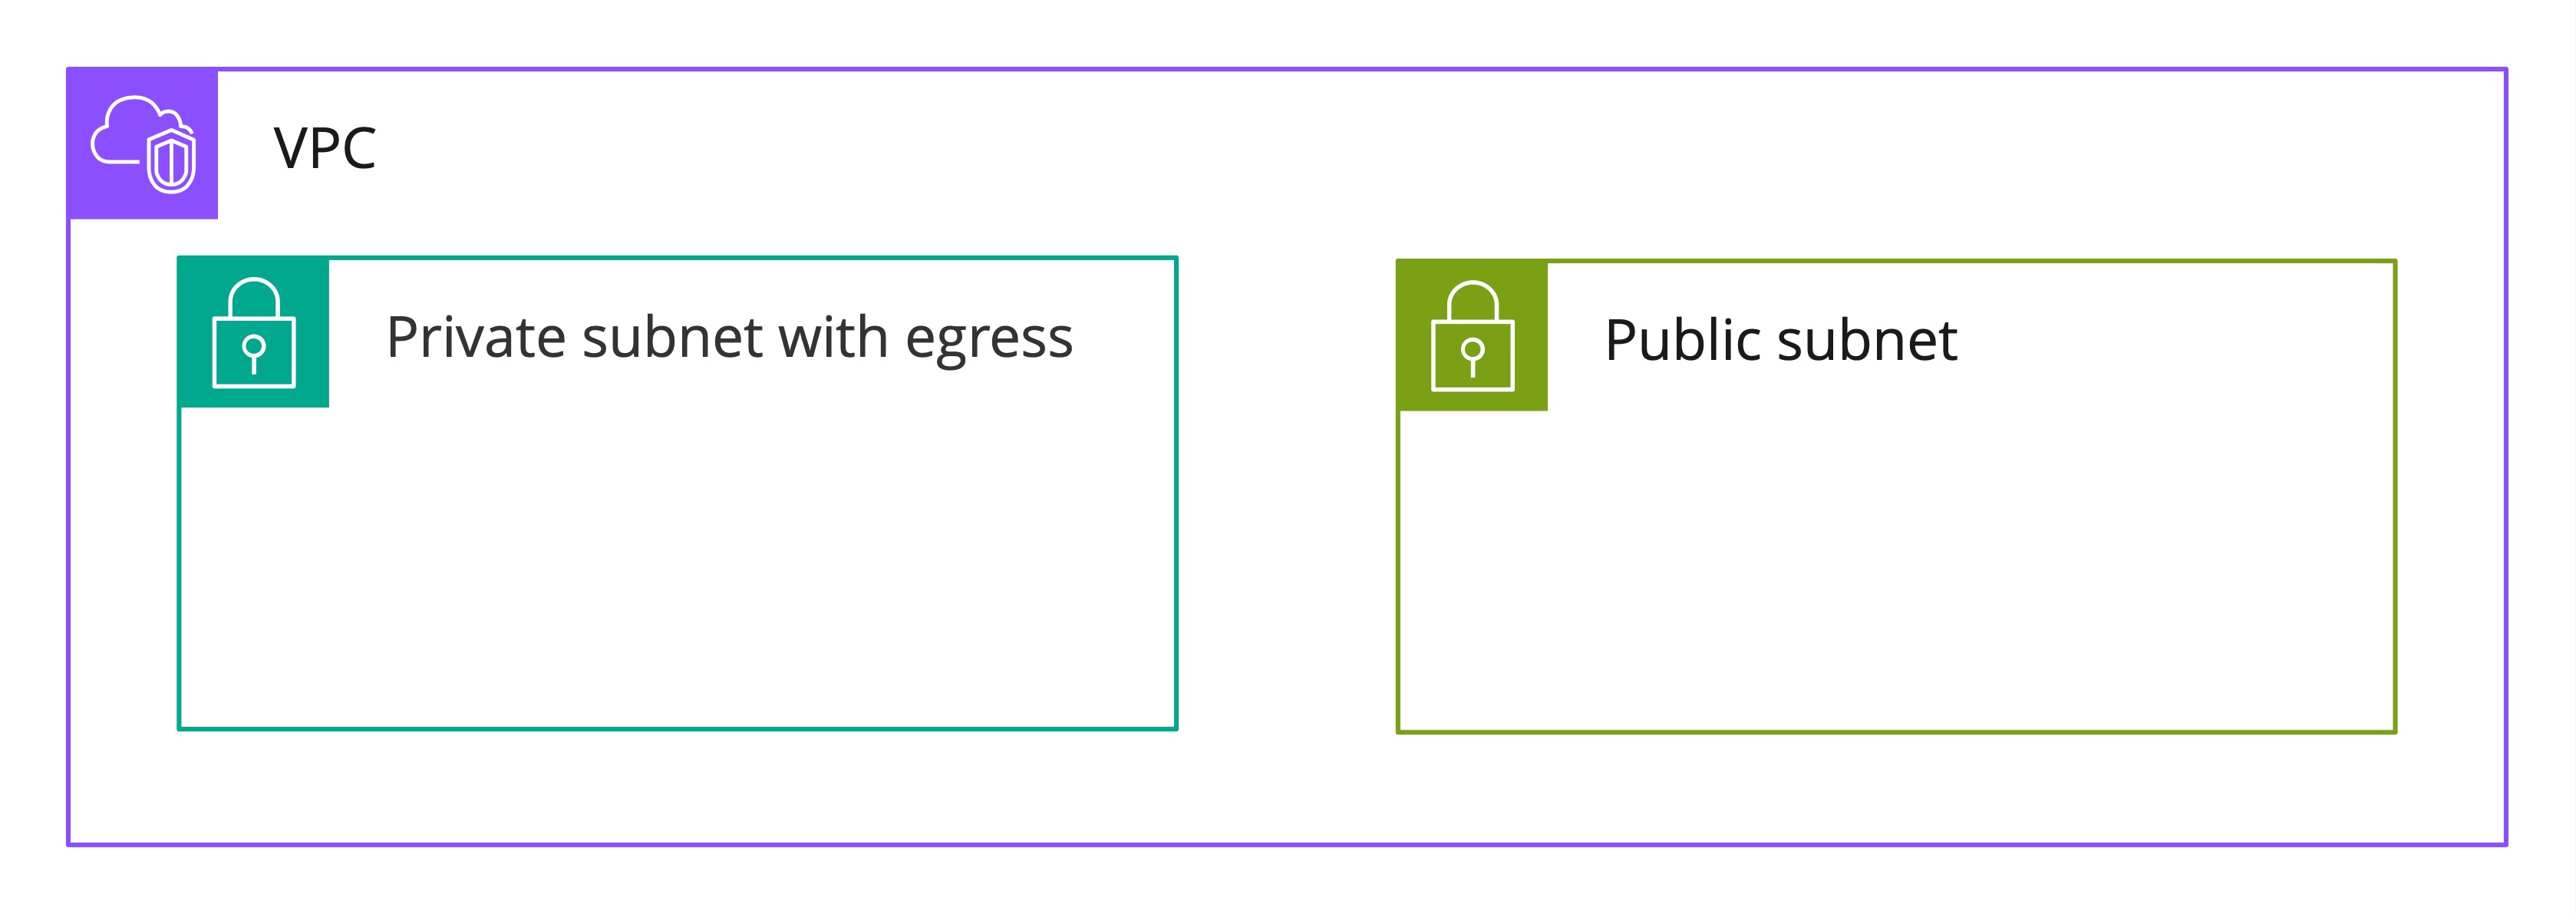
Next, we’ll need to define our database and cache clusters. Both DB and cache will be placed in the private subnet for security purposes.
final CfnSubnetGroup cacheSubnetGroup =                new CfnSubnetGroup(                        this,                        "smo-cache-subnet-group",                        CfnSubnetGroupProps.builder()                                .description("Redis Subnet Group")                                .subnetIds(                                        vpc.getPrivateSubnets().stream()                                                .map(s -> s.getSubnetId())                                                .collect(Collectors.toList()))                                .build());
        final SecurityGroup cacheSecurityGroup =                SecurityGroup.Builder.create(this, "smo-cache-sg")                        .description("Security group for Redis")                        .vpc(vpc)                        .build();

        final CfnCacheCluster cacheCluster = new CfnCacheCluster(this, "smo-cache",                CfnCacheClusterProps.builder()                        .engine("redis")                        .cacheNodeType("cache.t3.small")                        .numCacheNodes(1)                        .cacheSubnetGroupName(cacheSubnetGroup.getRef())                        .vpcSecurityGroupIds(Arrays.asList(cacheSecurityGroup.getSecurityGroupId()))                        .build()        );
        cacheCluster.addDependency(cacheSubnetGroup);        cacheSecurityGroup.addIngressRule(Peer.anyIpv4(), Port.tcp(cacheCluster.getPort()));
One interesting thing about defining Redis cache in CDK is the fact there are only autogenerated constructs available ( note the Cfn prefix in “CfnCacheCluster”) in the CDK. It makes the cluster somewhat low-level.
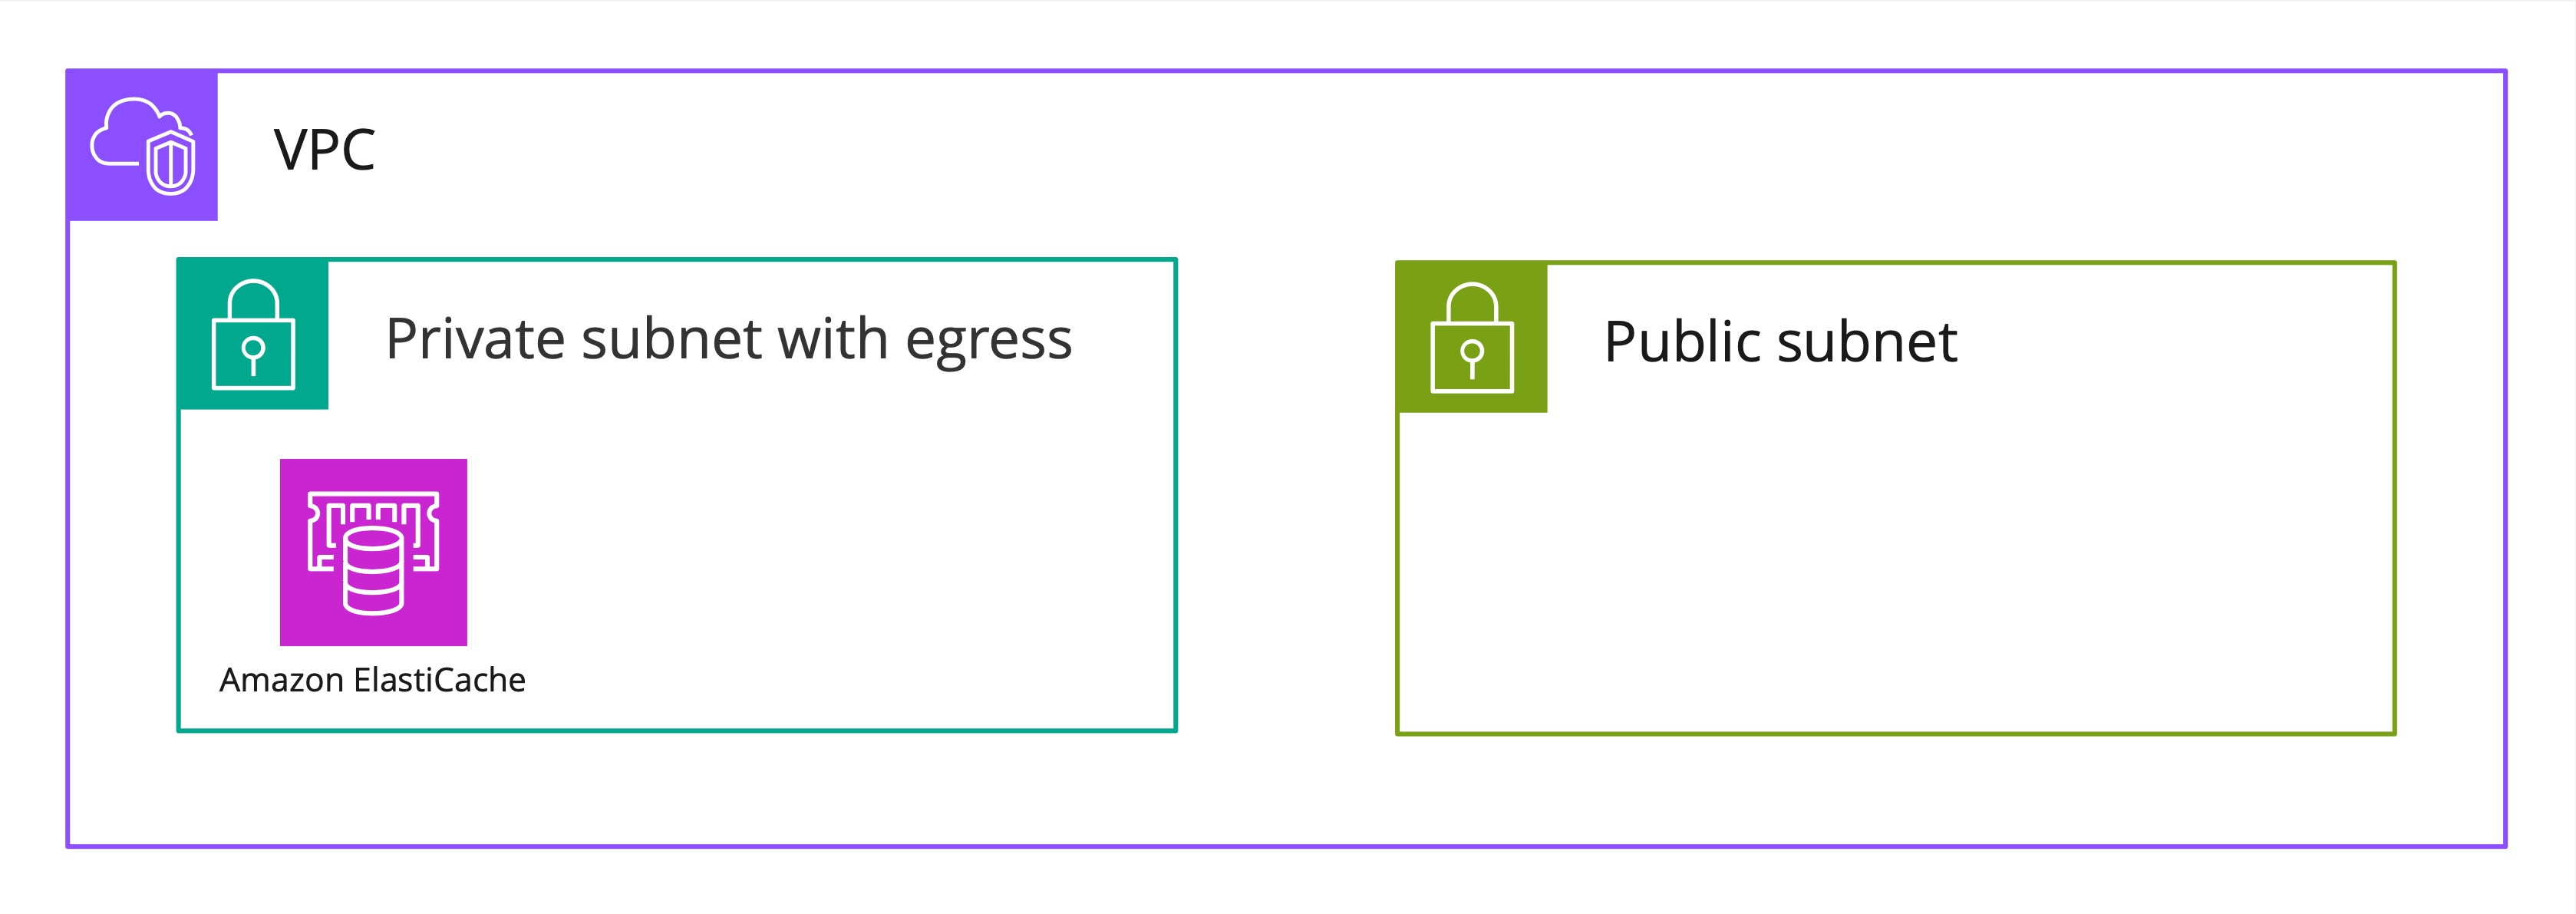
As the next step, we need to define the database cluster. We are going to use Amazon Aurora PostgreSQL for easy scaling.
 final Credentials rdsCredentials = Credentials.fromGeneratedSecret("smodbadmin");        final SecurityGroup rdsSecurityGroup =                SecurityGroup.Builder                        .create(this, "rds-smo-security-group")                        .description("SMO RDS security group")                        .vpc(vpc)                        .build();

        final DatabaseCluster smoDbCluster =                DatabaseCluster.Builder.create(this, "smo-db-cluster")                        .engine(                                DatabaseClusterEngine.auroraPostgres(                                        AuroraPostgresClusterEngineProps.builder()                                                .version(AuroraPostgresEngineVersion.VER_15_2)                                                .build()))                        .credentials(rdsCredentials)                        .removalPolicy(RemovalPolicy.SNAPSHOT)                        .defaultDatabaseName(SMO_DATABASE_NAME)                        .storageEncrypted(true)                        .instances(1)                        .backup(BackupProps.builder()                                .retention(Duration.days(30))                                .build())                        .instanceProps(                                InstanceProps.builder()                                        .instanceType(software.amazon.awscdk.services.ec2.InstanceType.of(InstanceClass.BURSTABLE3, InstanceSize.MEDIUM))                                        .vpcSubnets(SubnetSelection.builder().subnetType(SubnetType.PRIVATE_WITH_EGRESS).build())                                        .vpc(vpc)                                        .securityGroups(Arrays.asList(rdsSecurityGroup))                                        .build())                        .build();
Since it’s a development environment, the T3/burstable instance type is used. Database access credentials are automatically generated in AWS Secrets Manager and attached to the database cluster.
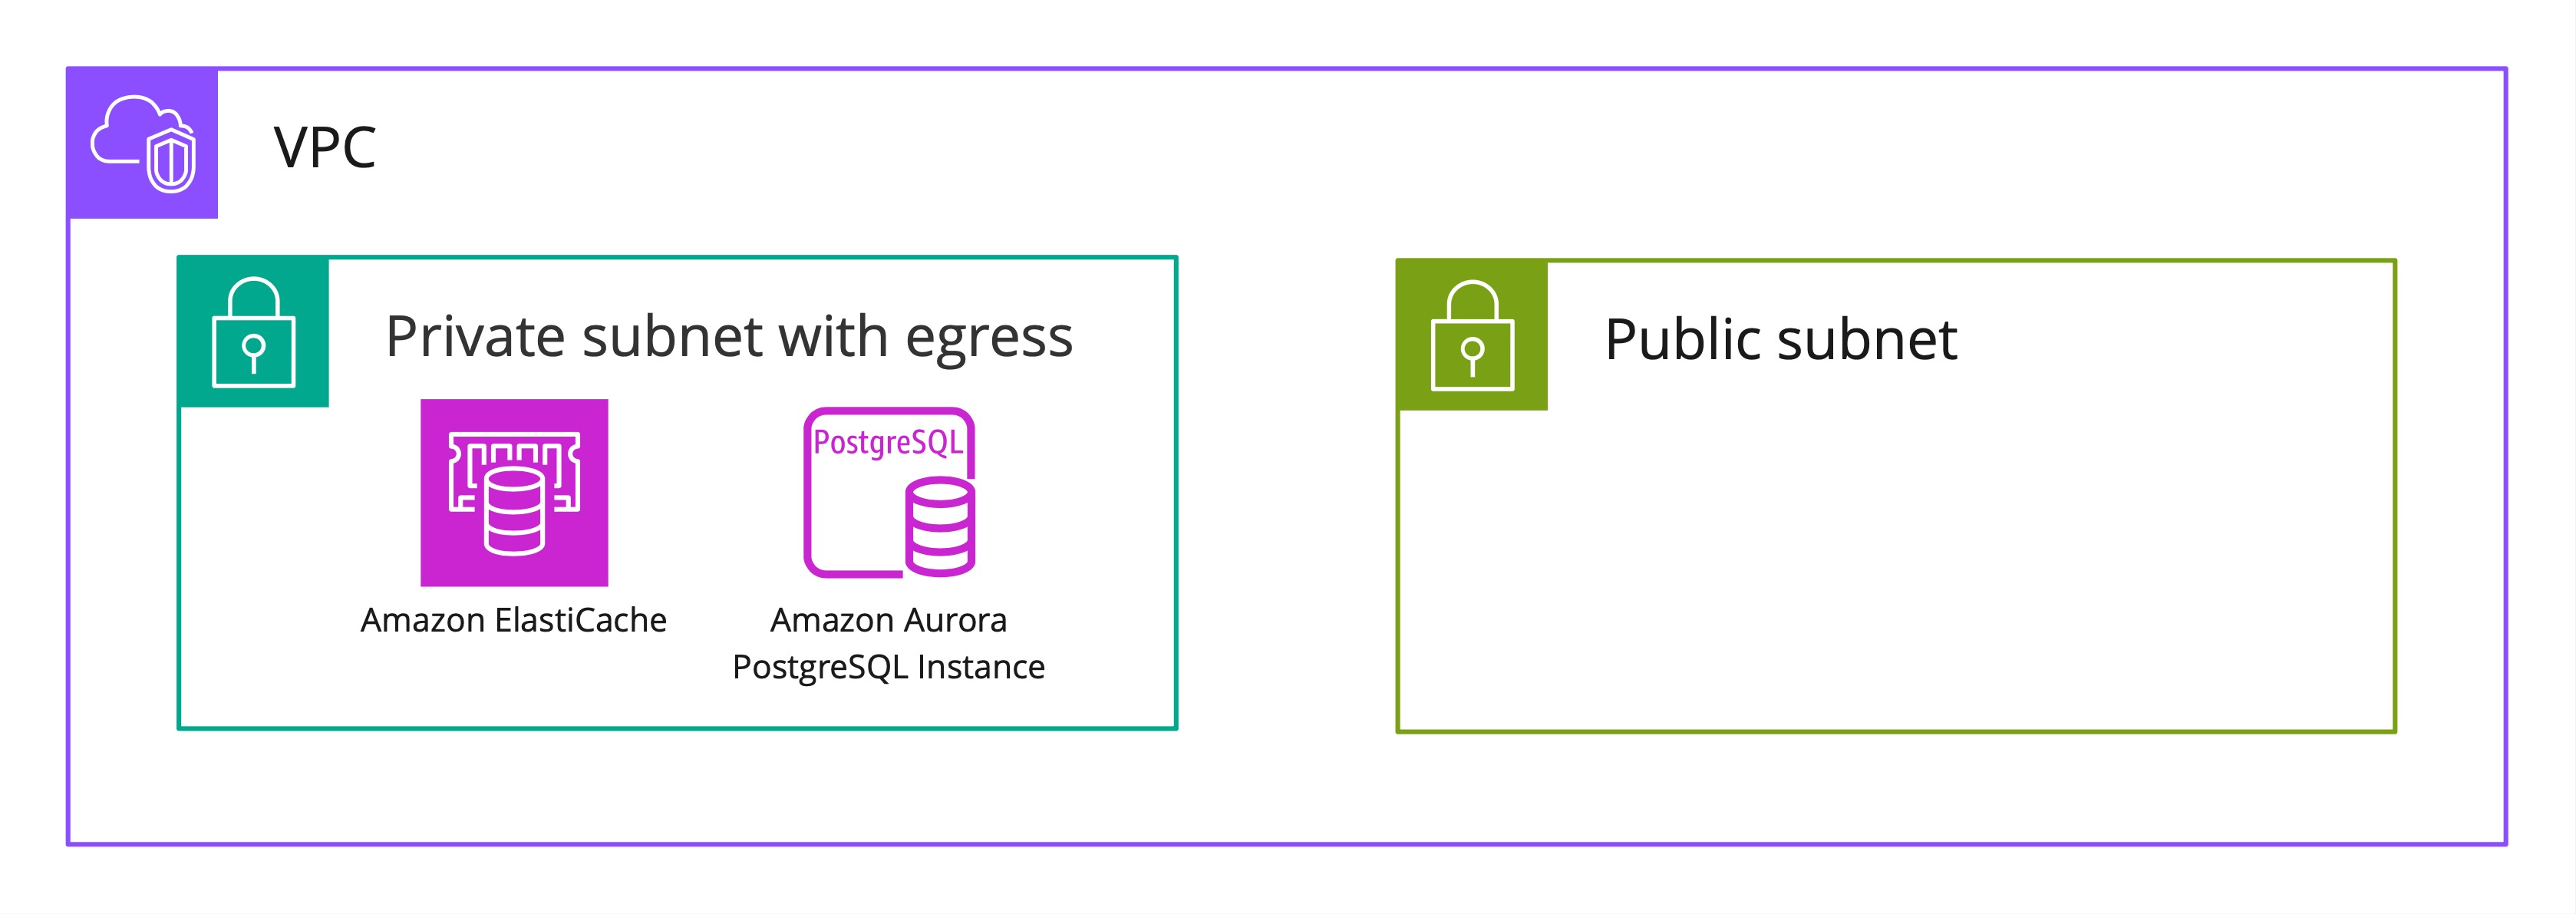
Now we have everything in place for our backend. For the sake of simplicity, I’m going to use AWS ECS. It doesn’t require any vendor lock on the application side, and is flexible and powerful. Additionally, using AWS Fargate removes a lot of operational overhead need to provision and maintain virtual machine instances.
final Cluster smoEcsCluster = Cluster.Builder.create(this, "smo-cluster") .clusterName(String.format("smo-cluster-dev")) .vpc(vpc) .enableFargateCapacityProviders(true) .containerInsights(true) .build();No doubts, it’s way more expensive than “raw” EC2 instances, but I prefer simple and reliable setups with minimum overhead.
Besides the cluster, we’ll need a task definition which provides information to AWS about what we want to run and a service to run it. OCI image is stored in AWS ECR repository and then pulled by AWS ECS.
 final TaskDefinition taskDefinition = new TaskDefinition(this, "smo-task-def-" + id,                TaskDefinitionProps.builder()                        .cpu("1024")                        .memoryMiB("4096")                        .compatibility(Compatibility.FARGATE)                        .family("smo-backend-task-def")                        .runtimePlatform(RuntimePlatform.builder()                                .operatingSystemFamily(OperatingSystemFamily.LINUX)                                .cpuArchitecture(CpuArchitecture.X86_64)                                .build())                        .build()        );
        final Repository repository = Repository.Builder.create(this, "smoRepo")                .repositoryName("smo-back").build();

        final LogGroup smoLogGroup = LogGroup.Builder.create(this, "smo-log-group-" + id)                .removalPolicy(RemovalPolicy.RETAIN)                .retention(RetentionDays.ONE_MONTH)                .build();
        final LogDriver smoLogDriver = AwsLogDriver.Builder.create()                .logGroup(smoLogGroup)                .streamPrefix("smo-")                .build();
        final FargateService smoService = new FargateService(this, "smo-service", FargateServiceProps.builder()                .serviceName("smo-backend-service")                .cluster(smoEcsCluster)                .assignPublicIp(false)                .enableExecuteCommand(true)                //.minHealthyPercent(100)                .desiredCount(0)                //.healthCheckGracePeriod(Duration.seconds(120))                .taskDefinition(taskDefinition)                .vpcSubnets(SubnetSelection.builder().subnetType(SubnetType.PRIVATE_WITH_EGRESS).build())                .build());
Here is a dirty hack which will make your life easier. We set the desiredCount to zero to make sure the first
deployment is successful even if the AWS ECR doesn’t have the needed image. The trick is CDK won’t complete deployment
unless the service is created and the desired count is reached. In a case if there is no image with the provided tag,
the deployment will fail.
And the final step, we need to inject environment variables and secrets into our task without hardcoding them. To do so, we can use task definition secrets and environment variables configuration.
final Map<String, String> envVariables = new HashMap<>();        envVariables.put("REDIS_HOST", cacheCluster.getAttrRedisEndpointAddress());        envVariables.put("REDIS_PORT", cacheCluster.getAttrRedisEndpointPort());
        final Map<String, Secret> secretVariables = new HashMap<>();        secretVariables.put(                "DATABASE_NAME",                Secret.fromSecretsManager(Objects.requireNonNull(smoDbCluster.getSecret()), "dbname"));        secretVariables.put(                "DATABASE_USER",                Secret.fromSecretsManager(Objects.requireNonNull(smoDbCluster.getSecret()), "username"));        secretVariables.put(                "DATABASE_PASSWORD",                Secret.fromSecretsManager(Objects.requireNonNull(smoDbCluster.getSecret()), "password"));        secretVariables.put(                "DATABASE_HOST",                Secret.fromSecretsManager(Objects.requireNonNull(smoDbCluster.getSecret()), "host"));        secretVariables.put(                "DATABASE_PORT",                Secret.fromSecretsManager(Objects.requireNonNull(smoDbCluster.getSecret()), "port"));        taskDefinition.addContainer("smo-back-container", ContainerDefinitionOptions.builder()                .image(ContainerImage.fromEcrRepository(repository))                .portMappings(Arrays.asList(PortMapping.builder()                        .containerPort(8080)                        .hostPort(8080)                        .protocol(Protocol.TCP)                        .build()))                .logging(smoLogDriver)                .environment(envVariables)                .secrets(secretVariables)                .containerName("smo-back-container")                .build());
At this point, we’ll have the following infrastructure provisioned.
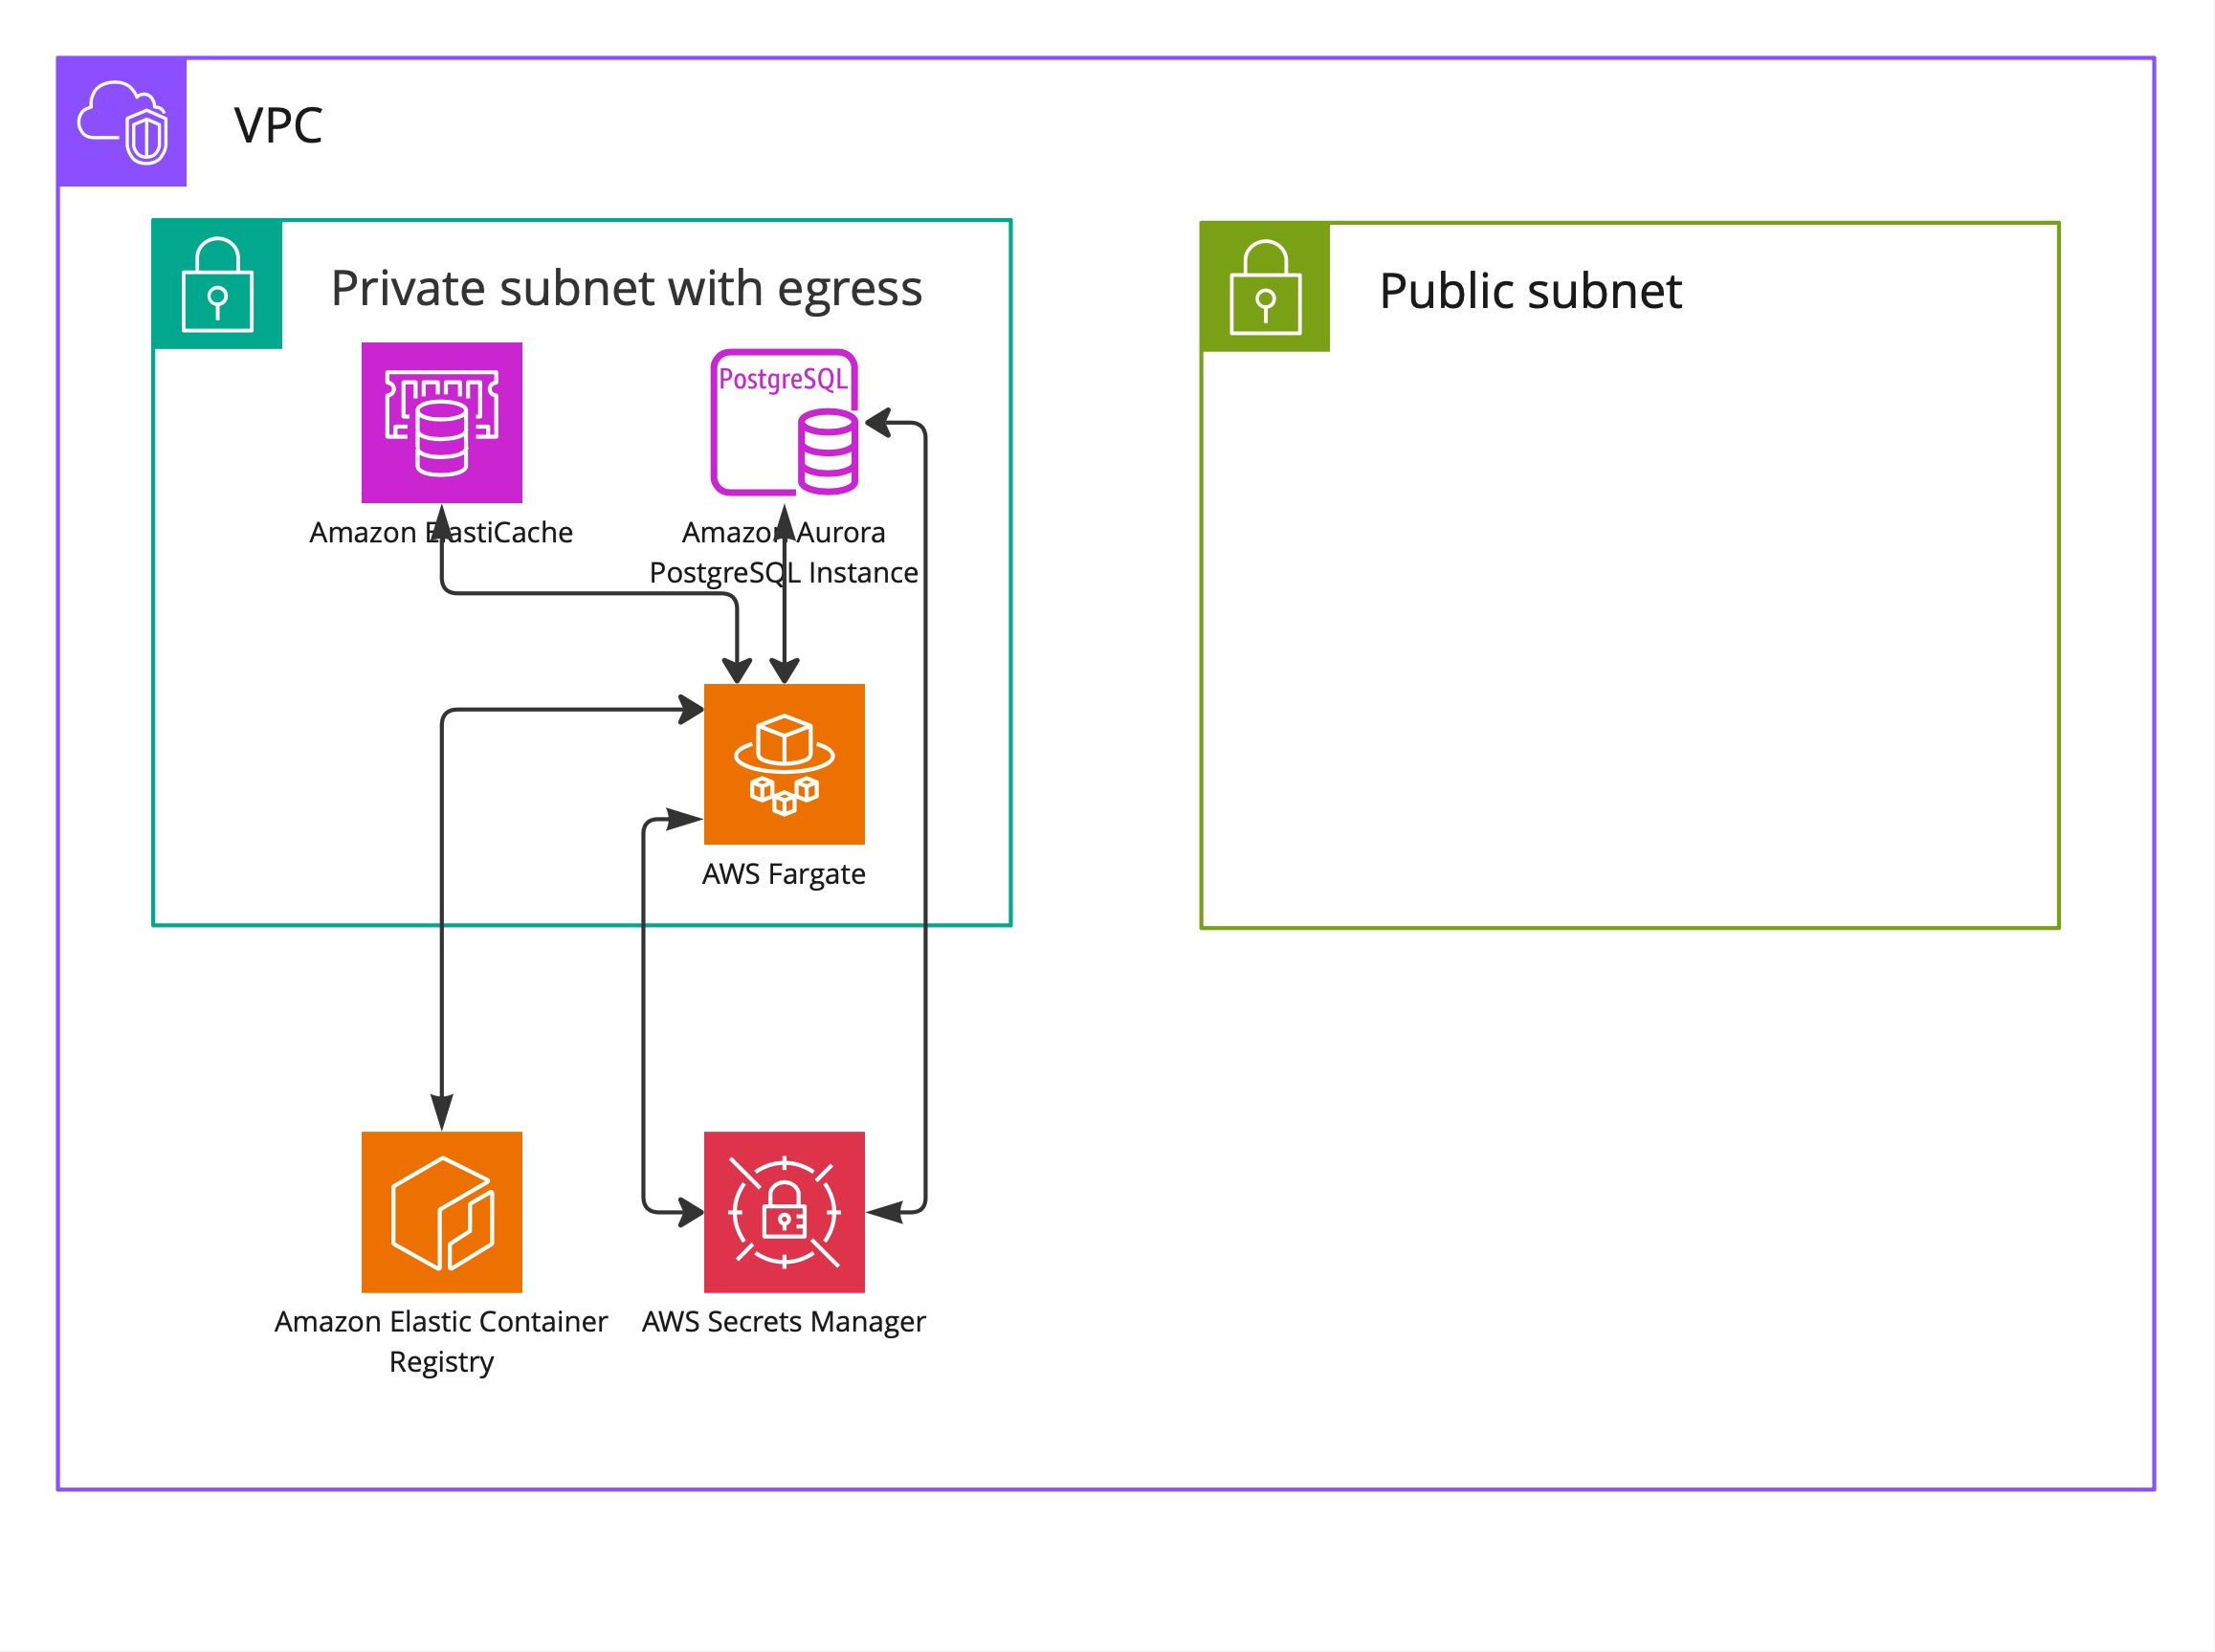
Finally, we need to expose our backend REST API to the Internet. Since our backend is running in the private subnet, we’ll need a load balancer for clients to reach it. We are going to use AWS Application Load Balancer. It’s an L7 load balancer which operates on the request level and is a great choice to use in a combination with the backend.
Before proceeding with AWS ALB, let’s provision a TLS certificate using AWS ACM.
        final IHostedZone hostedZone = HostedZone.fromLookup(this, "api-hosted-zone",                HostedZoneProviderProps.builder().domainName("xxx.xxxxx.xxx").build());
        final Certificate certificate = Certificate.Builder.create(this, "smo-cert").domainName("xxx.xxxxx.xxx")                .validation(CertificateValidation.fromDns(hostedZone)).build();
A DNS-based validation is used. Since the domain provided is managed by AWS Route 53, corresponding validation records will be automatically added by AWS ACM.
To inform the ALB about how to handle traffic for our backend, we’ll create a target group. The idea is that the target group directs traffic to the AWS Fargate service and the Swagger documentation page is used to perform a health check.
final ApplicationTargetGroup targetGroup = ApplicationTargetGroup.Builder.create(this, "smo-backend-tg") .port(8080) .targets(Arrays.asList(smoService)) .protocol(ApplicationProtocol.HTTP) .vpc(vpc) .healthCheck(HealthCheck.builder() .port("8080") .protocol(software.amazon.awscdk.services.elasticloadbalancingv2.Protocol.HTTP) .path("/swagger-ui/index.html") .build()) .build();Our application load balancer will have two listeners for HTTP and HTTPS traffic correspondingly. All HTTP traffic is going to be redirect to HTTP, while the HTTPS traffic will go to our newly created target group.
final ApplicationListener httpsListener = loadBalancer.addListener("main-listener", BaseApplicationListenerProps.builder()                .protocol(ApplicationProtocol.HTTPS)                .port(443)                .open(true)                .sslPolicy(SslPolicy.RECOMMENDED_TLS)                .certificates(Arrays.asList(ListenerCertificate.fromCertificateManager(certificate)))                .defaultTargetGroups(Arrays.asList(targetGroup))                .build());
        final ApplicationListener httpListener = loadBalancer.addListener("redirect-listener", BaseApplicationListenerProps.builder()                .protocol(ApplicationProtocol.HTTP)                .port(80)                .open(true)                .defaultAction(ListenerAction.redirect(RedirectOptions.builder()                        .protocol(ApplicationProtocol.HTTPS.name())                        .port("443")                        .build()))                .build());
Finally, we’ll configure a Route 53 alias to point to our load balancer, to allow clients access our backend via a fancy domain name.
final ARecord aRecord = ARecord.Builder.create(this, "smo-lb-alias") .zone(hostedZone) .target( RecordTarget.fromAlias( new LoadBalancerTarget(loadBalancer) ) ) .build();The resulting infrastructure will look like this.
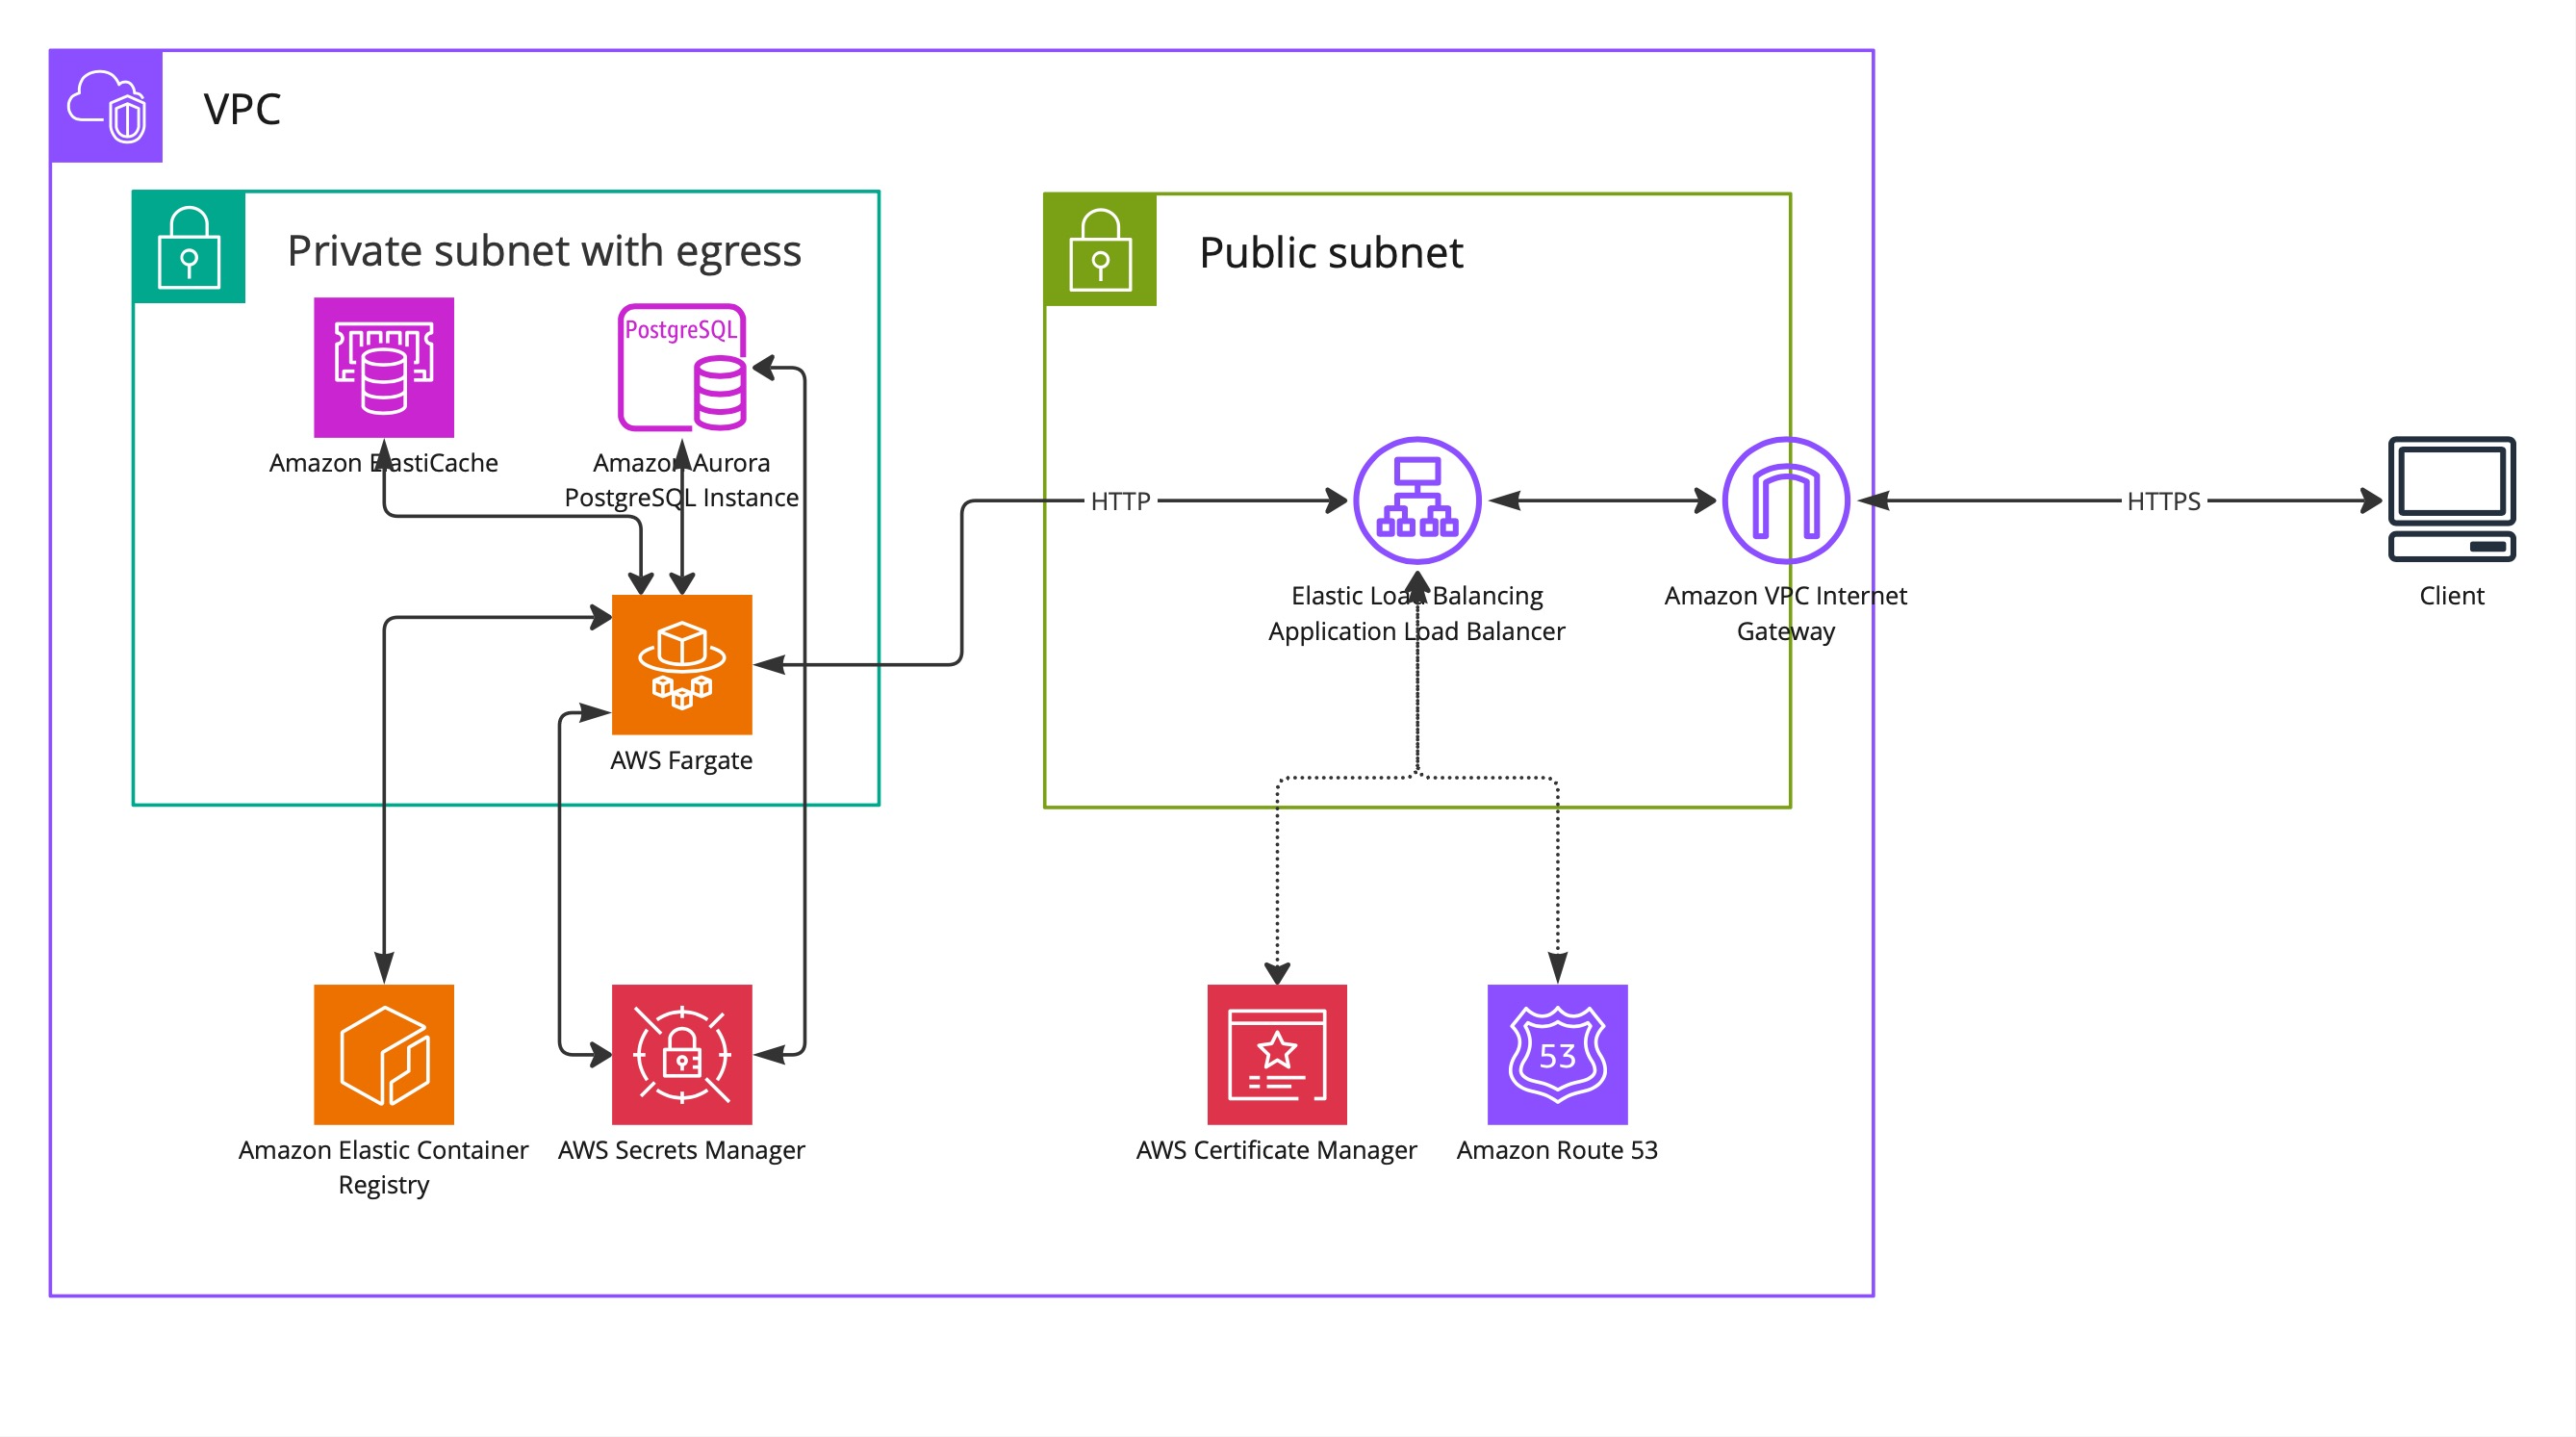
At this point, we have everything in place to run our backend and underlying infrastructure. The next step is to automate the deployment.
CI/CD for backend
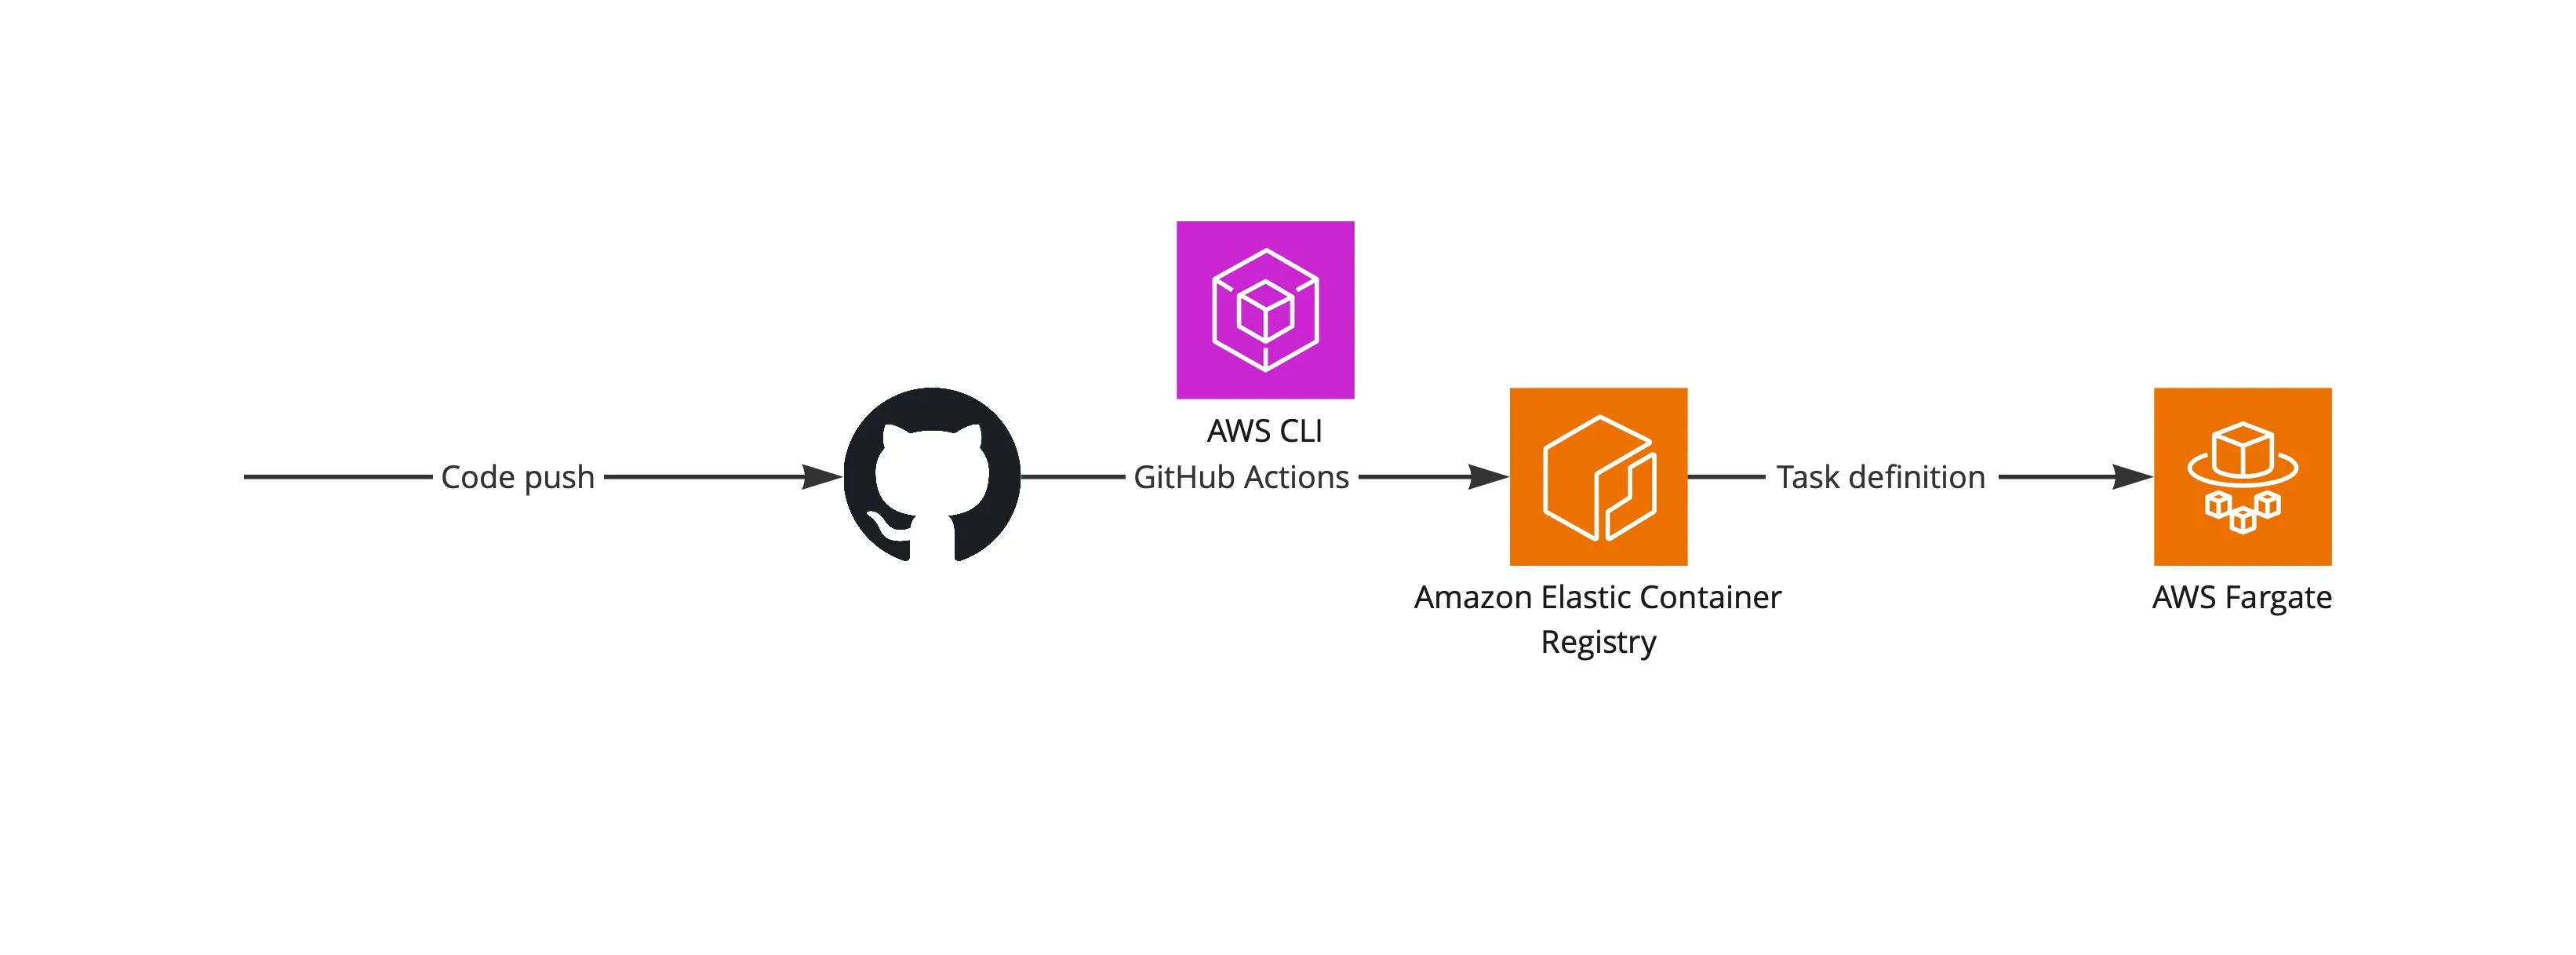
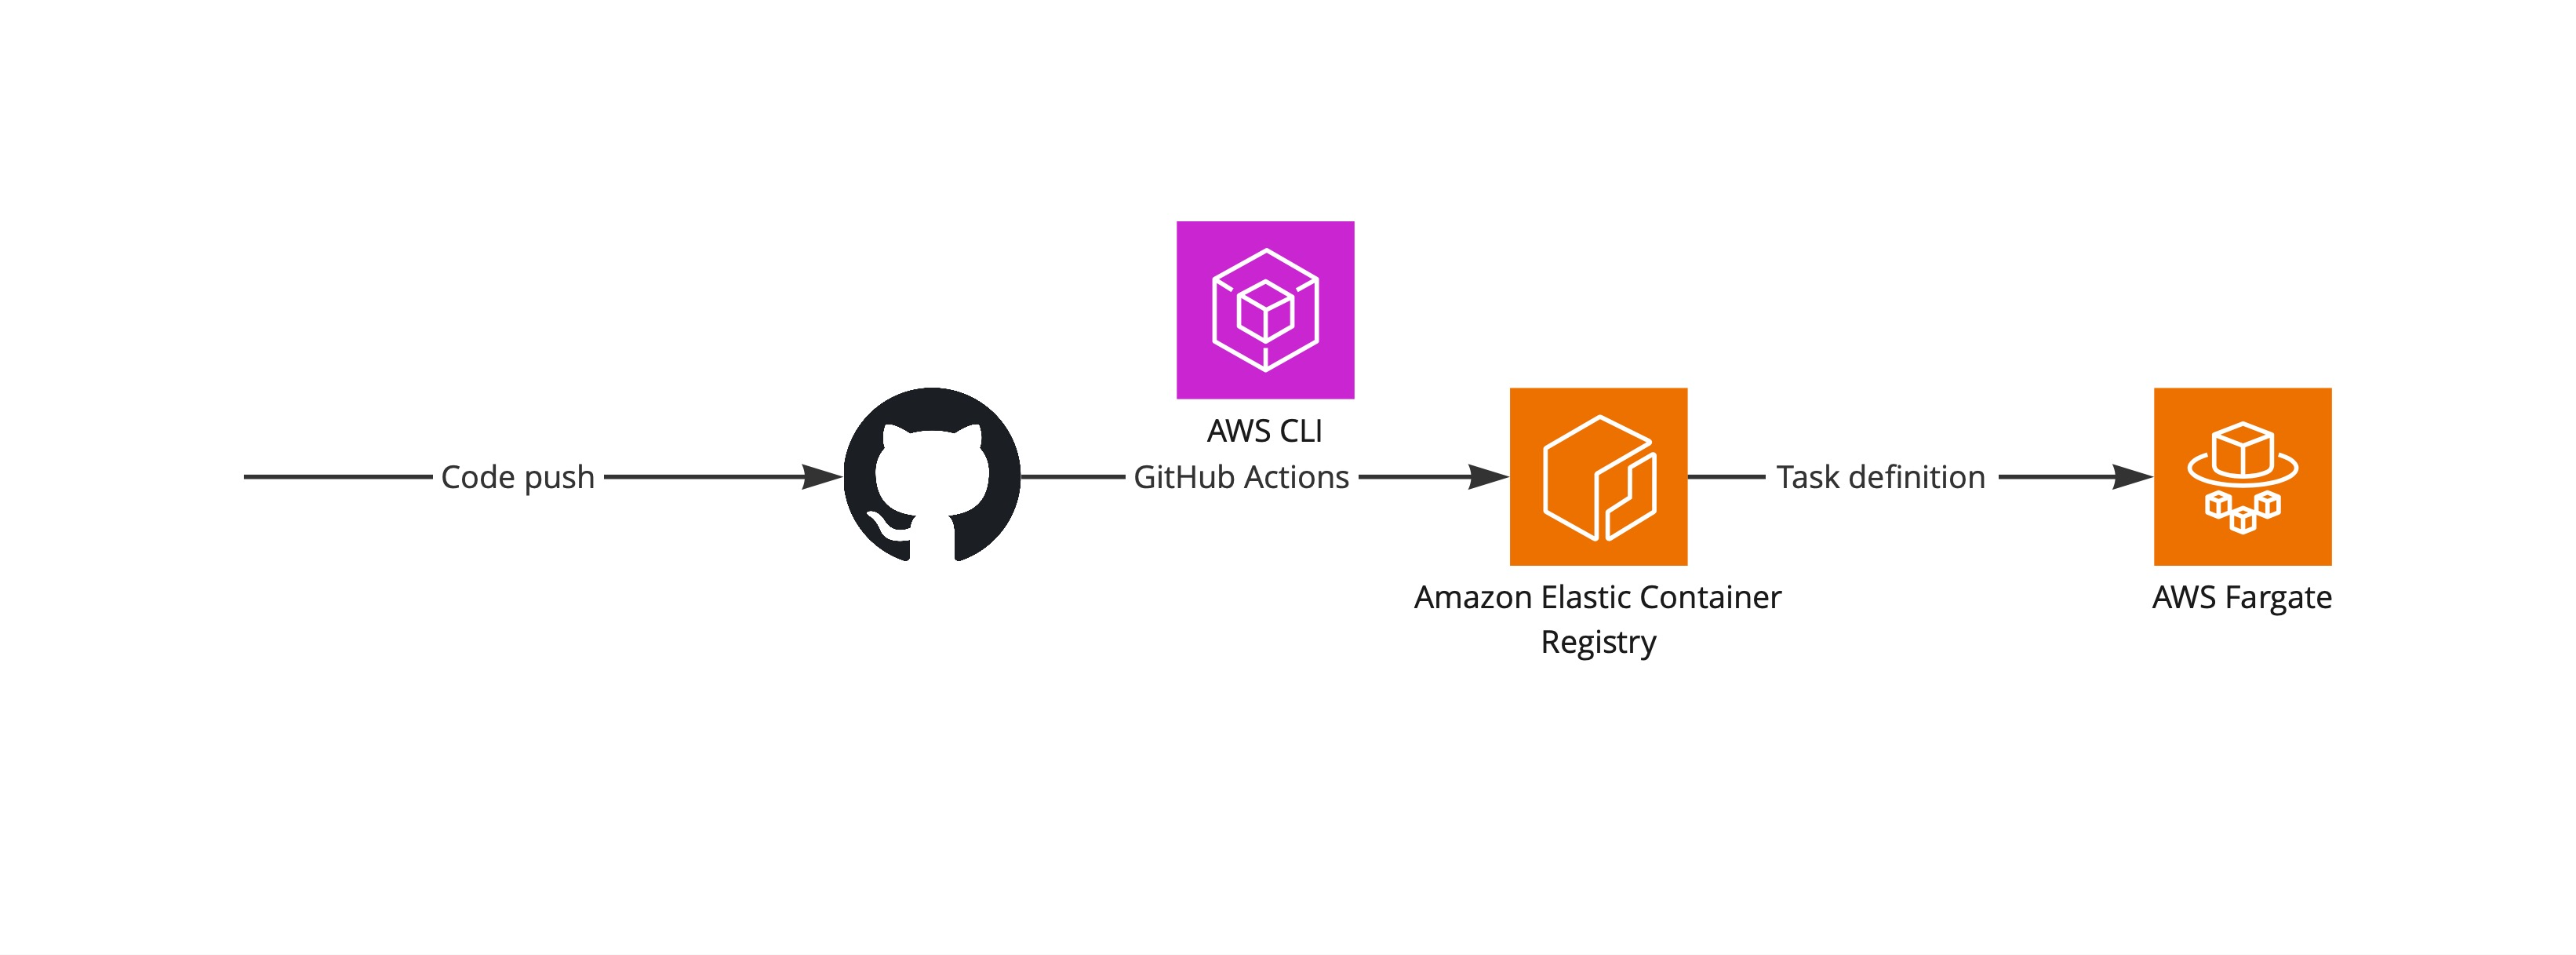
While the CI/CD pipeline will be defined using the Infrastructure as a code (CDK in our case), I think it deserves a separate chapter here for various reasons. Let’s start from the CI/CD pipeline design.

The structure on the diagram above is standard and straightforward. Let’s move on to selecting particular technologies for the implementation since it will be more interesting.
Thoughts on the build process
The ideal build process for me is one that is easy to configure, fast and provides easy access to build results and build artifacts. We use Git as our version control system of choice and most of the time repositories are hosted on GitHub.
For complicated projects, we would lean towards a combination of AWS CodePipeline and AWS CodeBuild. In the case of simpler projects, I would prefer to use GitHub actions. A significant benefit is being able to access build logs right in the GitHub without a need of switching contexts and going to the AWS console.
Defining GitHub Actions workflow
Let’s proceed with defining the workflow. The backend code is in the “emo-core” subdirectory of the git repository, thus GitHub Actions workflow working directory is overridden.
name: SMO Deployon:  push:    paths:      - 'smo-core/**'    branches:      - mainjobs:  deploy:    name: Deploy app    runs-on: ubuntu-latest    defaults:      run:        working-directory: ./smo-core    steps:      - name: Checkout code        uses: actions/checkout@v4
      - name: Configure AWS credentials        uses: aws-actions/configure-aws-credentials@v1        with:          aws-access-key-id: ${{ secrets.AWS_ACCESS_KEY_ID }}          aws-secret-access-key: ${{ secrets.AWS_SECRET_ACCESS_KEY }}          aws-region: us-east-1
      - name: Login to Amazon ECR        id: login-ecr        uses: aws-actions/amazon-ecr-login@v1      - name: Get current date        id: date        run: echo "::set-output name=date::$(date +'%s')"      - name: Build, tag, and push image to Amazon ECR        env:          ECR_REGISTRY: ${{ steps.login-ecr.outputs.registry }}          ECR_REPOSITORY: smo-back          IMAGE_TAG: v-${{ steps.date.outputs.date }}        run: |          docker build -t $ECR_REGISTRY/$ECR_REPOSITORY:$IMAGE_TAG .          docker push $ECR_REGISTRY/$ECR_REPOSITORY:$IMAGE_TAG
      - name: Download task definition        id: download-task-definition        run: |          aws ecs describe-task-definition --task-definition smo-backend-task-def --query taskDefinition > task-definition.json
      - name: Render Amazon ECS task definition        id: render-web-container        uses: aws-actions/amazon-ecs-render-task-definition@v1        with:          task-definition: smo-core/task-definition.json          container-name: smo-back-container          image: ${{ steps.login-ecr.outputs.registry }}/smo-back:v-${{ steps.date.outputs.date }}
      - name: Deploy to Amazon ECS service        uses: aws-actions/amazon-ecs-deploy-task-definition@v2        with:          task-definition: ${{ steps.render-web-container.outputs.task-definition }}          service: smo-backend-service          cluster: smo-cluster-dev
Note the Render Amazon ECS task definition section. The path to the task definition is relative to the root directory
of the repository, since aws-actions/amazon-ecs-render-task-definition@v1 doesn’t honor the working directory of the
workflow. This is important, since failing to provide a correct path here may result in hours of debugging (trust me,
I’m telling it from my personal experience).

Let’s quickly review the workflow above:
- The backend code is being copied from the repository
- ECR login is performed
- Docker image containing backend is created and pushed to the AWS ECR Repository
- A task definition of the backend service is modified to use the new image
- Updated task definition is deployed to AWS ECS.
CI/CD for frontend
On the frontend side I had two goals. First, I wanted to use CloudFlare CDN capability to serve the statically generated frontend. Second, I wanted to evaluate per-branch previews provided by CloudFlare Pages.
Unlike backend, no GitHub Actions workflows were used to build the frontend. Instead, builds are happening on the CloudFlare side for the sake of simplicity.
Each pull request is processed by CloudFlare and a preview deployment is created:

Final words
This particular setup gives us a PaaS-like experience where each push to the GitHub repo results in a deployment. I could use an existing PaaS like AWS BeanStalk or AWS App Runner on the Amazon Web Services side. Alternatively, Heroku or Fly.io would work fine. Initially, Fly.io was used for the backend, but I was not comfortable with its semi-managed PostgreSQL and other minor things. AWS BeanStalk or AWS App Runner would require vendor-specific configuration files and personally I would prefer more vendor-specific infrastructure provisioning code(AWS CDK) to ensure the application itself is platform-agnostic.
Need help with your cloud architecture?
Schedule a Free Consultation
